
How to set up MX records & what they are for (with examples)
If you don’t set up your MX records, your cold email campaign will fail.
Why?
Because when people respond to your emails, you wouldn’t receive the replies!
Understanding how to set up MX records is crucial for email deliverability and the success of your outreach campaigns.
In this article, you'll learn how to configure MX records for different domains and email providers with examples of real-life domain's MX records.
What is a DNS MX record?
An MX record specifies a domain's receiving email server.
It tells the sending server where to route incoming emails.
If your domain lacks a properly configured MX record, you won't be able to receive emails.
For small businesses, MX records are usually provided by your hosting or domain provider, and you only need to worry about them when changing providers.
Here's a more elaborate explanation of what MX records are.
What does the DNS MX record consist of?
A DNS MX record consists of Hostname, Type, TTL, Priority/Preference, and Value.
This is what they stand for:
- Hostname: This is your domain name. A hostname and IP simply indicate to what domain emails will be sent to.
- Type: Type specifies the kind of DNS record being created. For MX (Mail Exchange) records, it is essential to set this type correctly to ensure that the DNS record serves its intended purpose of directing email traffic.
- TTL (Time to Live): Specifies the time in seconds that an MX record is cached by servers. Normally, it’s set to Auto.
- Priority: You can and should have multiple MX records, so you have backup incoming email servers configured in case the primary server is experiencing issues. The priority setting determines which server(s) should be tried first. A mail server trying to send an email to you will always try the lowest number priority first! If two or more MX records tie for the lowest preference value, the sending mail server randomly picks one for the first delivery attempt.
- Value: Contains the email server address (MX address of the provider). The priority or preference indicates which mail server will be used if multiple MX records exist.
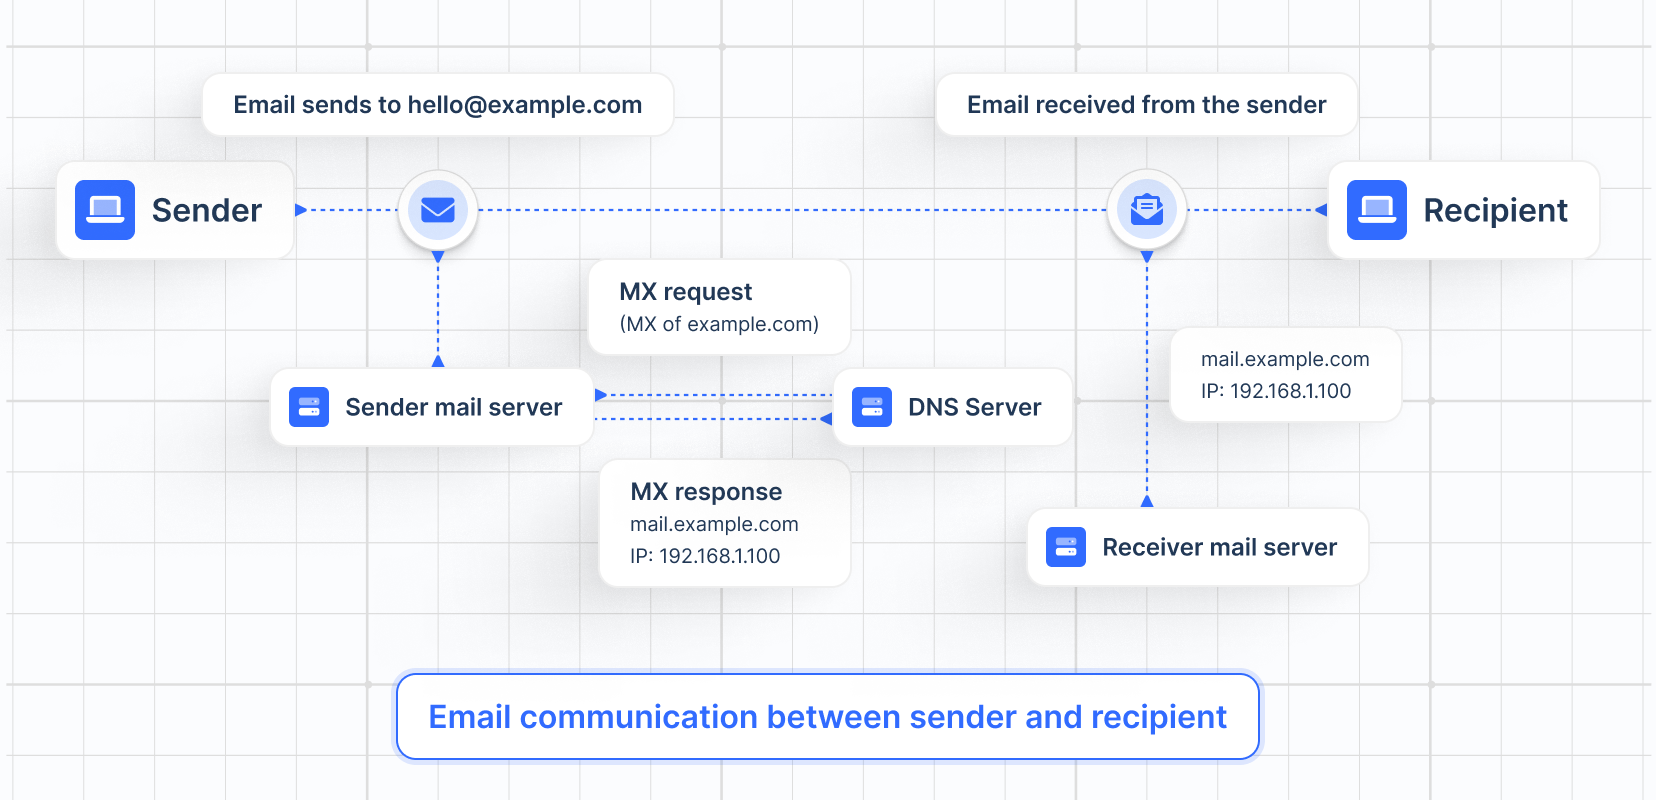
How do MX records work?
To understand MX records and how they work, think of them as an address to your place.
Think of the receiving email server as the street address, your email address as your specific house or unit number, and the MX records as the map to find the street you’re living in.
To find the street (receiving email server), the sending server consults the map (MX records).
If there was no map (MX records), the sending server would have no idea as to where to deliver the email.
Why do you need DNS MX records?
NS MX (Mail Exchange) records are crucial for ensuring that your cold outreach emails are delivered successfully. Here's why:
1. Routing Emails to Your Mail Server:
MX records tell other mail servers where to deliver emails sent to your domain.
Without correct MX records, emails sent to your domain (e.g., sales@example.com) would not know where to go, leading to non-delivery.
2. Email Deliverability:
Ensuring your MX records are correctly configured is essential for maintaining email deliverability.
Email servers use MX records to verify that your domain is properly set up to receive email.
If your MX records are missing or incorrect, your emails could end up in recipients' spam folders or bounce back.
3. Trust Factor:
When your email domain has correctly configured MX records, it signals to other mail servers that your domain is legitimate and trustworthy.
This trust factor is crucial for cold outreach, where the first impression can significantly impact the recipient's willingness to engage with your email.
4. Email Authentication and Verification:
Properly configured MX records work in conjunction with other email authentication protocols like SPF, DKIM, and DMARC.
These protocols help verify that your emails are coming from legitimate sources.
Email servers often check these records to prevent spam and phishing attempts, improving the chances that your email will be successfully delivered.
5. Failover and Reliability:
By setting up multiple MX records with different priorities, you ensure that your email system has redundancy.
If the primary mail server is unavailable, the email can be routed to a secondary server.
This redundancy is critical for ensuring your email outreach campaign continues smoothly without interruptions.
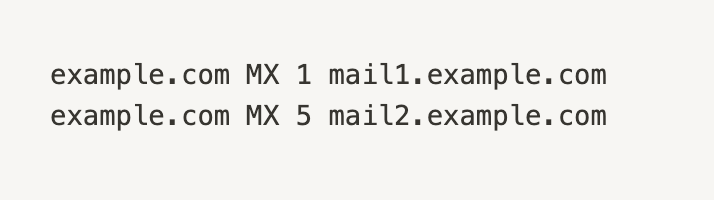
MX record example
This is the example of how your MX record should look like:
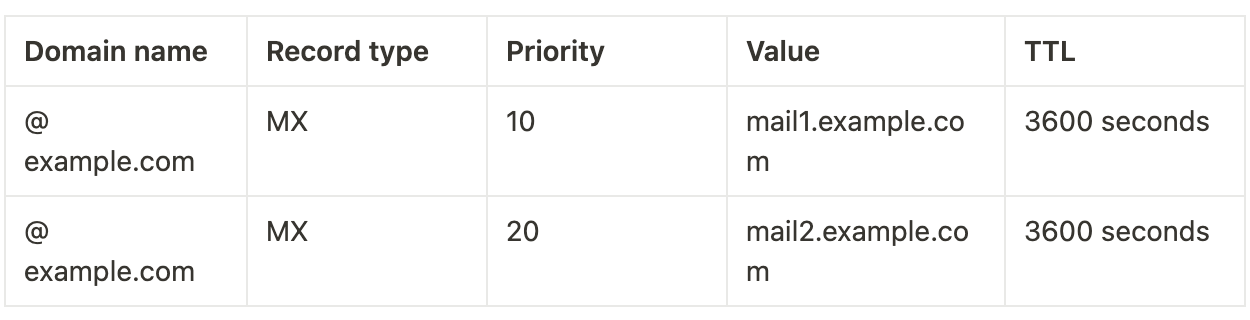
Components of an MX record explained
1. Domain Name:
@ - This symbol represents the root domain (e.g., example.com). It indicates that this MX record applies to the main domain.
2. Record Type:
MX - It stands for "Mail Exchange". This type of DNS record specifies mail servers responsible for receiving email on behalf of the domain.
3. Priority:
10 and 20 - These numbers indicate the priority of the mail servers. Lower numbers denote higher priority. For example, 10 has a higher priority than 20.
4. Value:
mail1.example.com and mail2.example.com - These are the hostnames of the mail servers. Emails will be routed to these servers based on their priority and availability.
5. TTL (Time To Live):
3600 seconds - This is the amount of time (in seconds) that DNS servers should cache this record. In this case, it's set to 3600 seconds (or 1 hour).
How It Works:
When an email is sent to a user@example.com, the sender's mail server queries the DNS for the MX records of example.com.
The DNS query returns both MX records:
- 10 mail1.example.com
- 20 mail1.example.com
The sending mail server will attempt to deliver the email to mail1.example.com first because it has the highest priority (lowest number).
If mail1.example.com is unavailable, the sending server will then try mail2.example.com as a fallback option due to its lower priority (higher number).
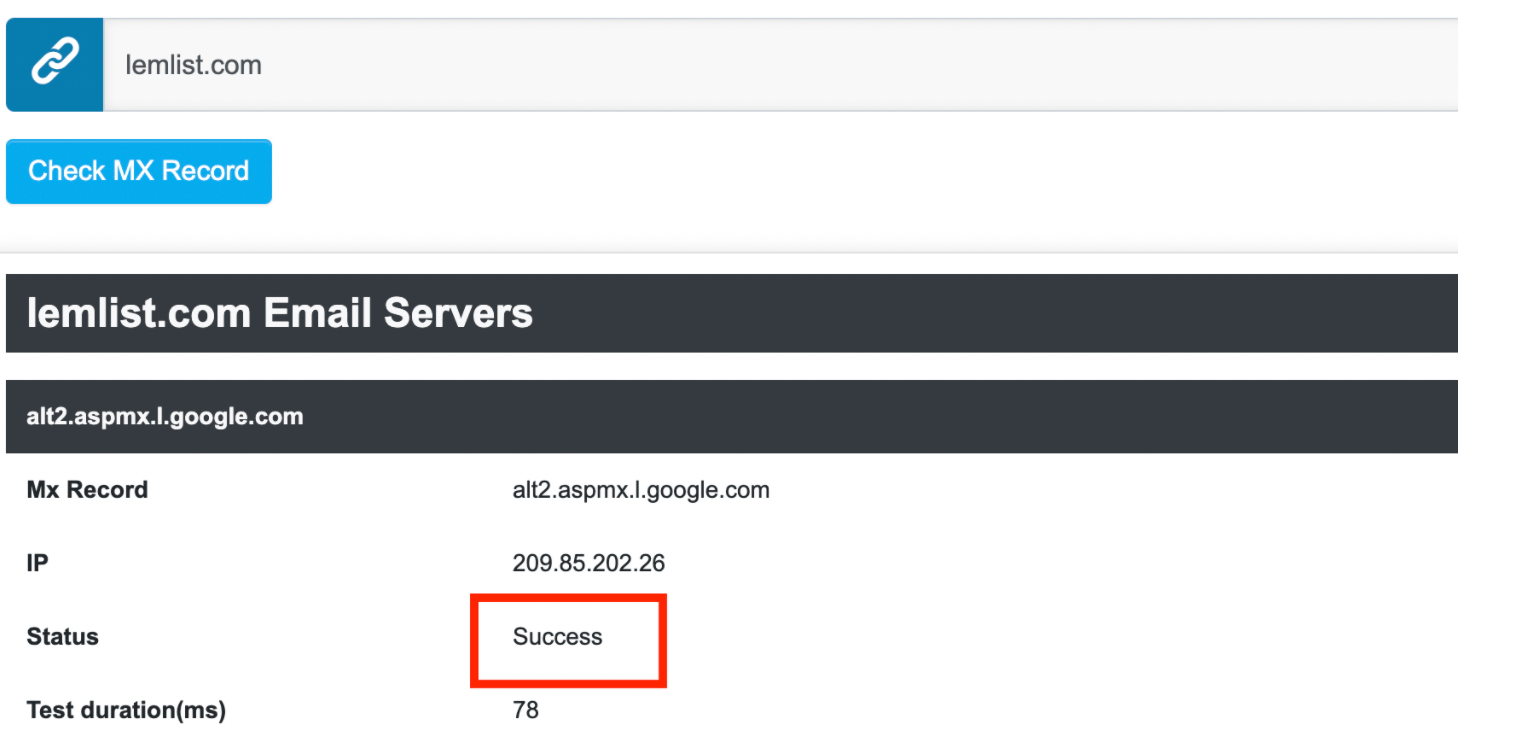
Here's an existing MX records example from lemlist:

You can use this tool to find your MX records and whether or not you have them set up.
Check if you have MX records up and running
If you see this, it means your MX setup is correct:
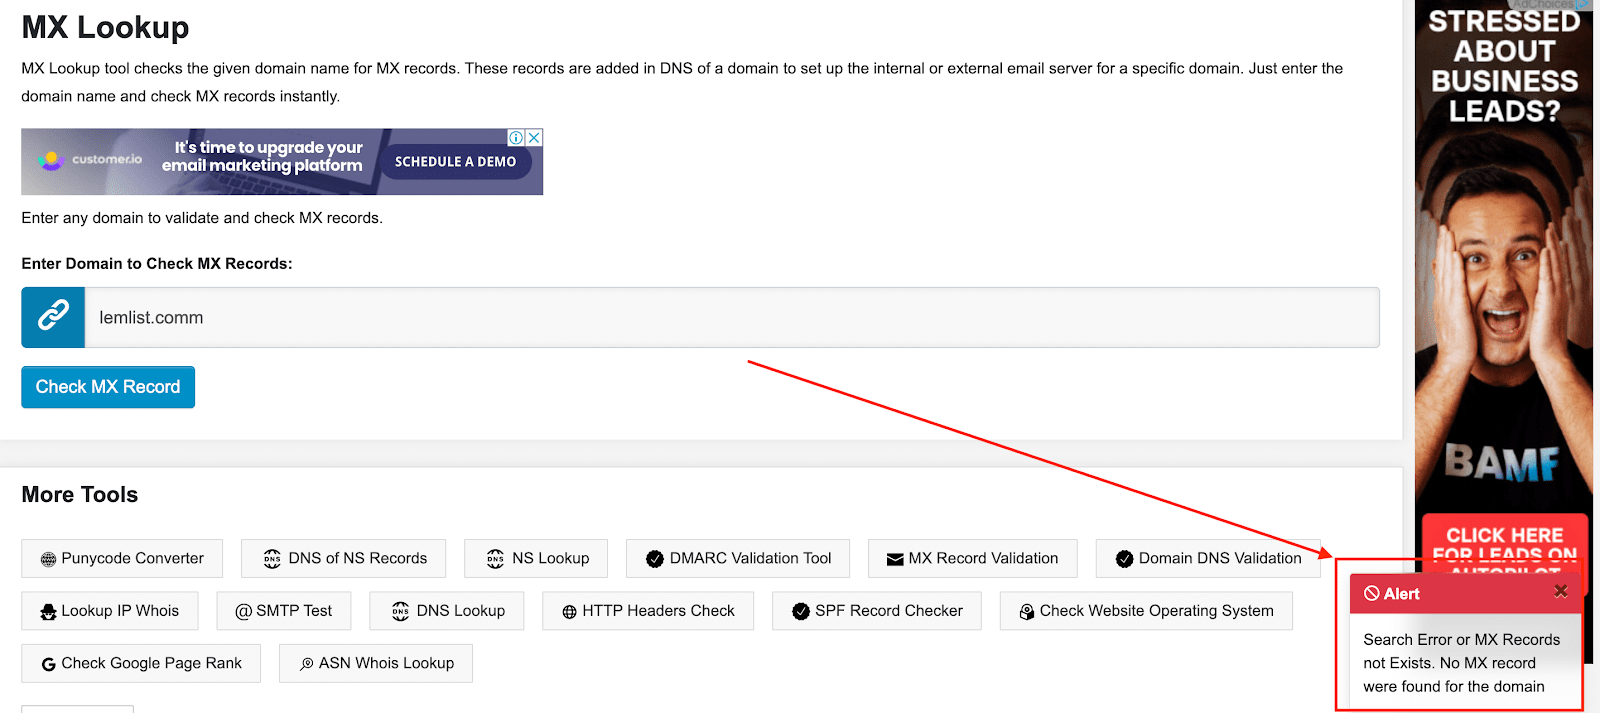
But if you see this, you need to set up your MX record:
Here’s how to set your MX records
Below are the tutorials on how to set your MX records with Google and Microsoft Office.
Google MX records setup
It’s important to note that there are different settings for different hosting.
For some, you need to create MX records manually. In some cases, you can do it much easier.
You need to update your domain's MX records to use Gmail with Google Workspace.
You add and manage MX records on your domain registrar's website and NOT on Google.
Pick your host here and follow the steps to set up your MX records.
Here’s a step-by-step guide to help you configure MX records for your domain using Google Workspace:
1. Log in to Your Domain Registrar: Access the account where you registered your domain.
2. Locate the DNS Management Page: Find the section for managing DNS records, often labeled as "DNS Management," "Name Server Management," or similar.
3. Select the Domain: Choose the specific domain you want to configure.
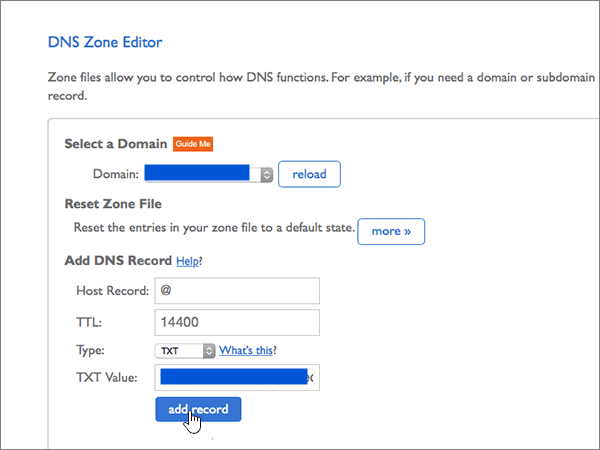
4. Open the DNS Manager: Navigate to the DNS manager or DNS Zone Editor where you can add or edit DNS records.
5. Delete Existing MX Records (Optional but recommended): If there are any existing MX records, delete them to avoid conflicts.
6. Add Google’s MX Records:
7. Save the MX Records: Click "Save" or "Add Record" to update your DNS settings.
8. Wait for DNS Propagation: DNS changes can take anywhere from a few minutes to up to 48 hours to propagate globally.
9/ Verify MX Record Setup: Use a tool like Google’s Dig tool or any other DNS lookup tool to verify that the MX records have been correctly added to your domain.
It’s important to note that for some domain registrars, Google will automatically do the set-up for you (this is the case for Gandi, for example).
How to set up MX records - for all domain providers
There are different settings for different hostings. For some you need to create MX records manually. In some cases you can do it much easier.
In order to find a better set up for your host - pick your host here and follow the steps there.
How to setup MX records on Google for Namecheap
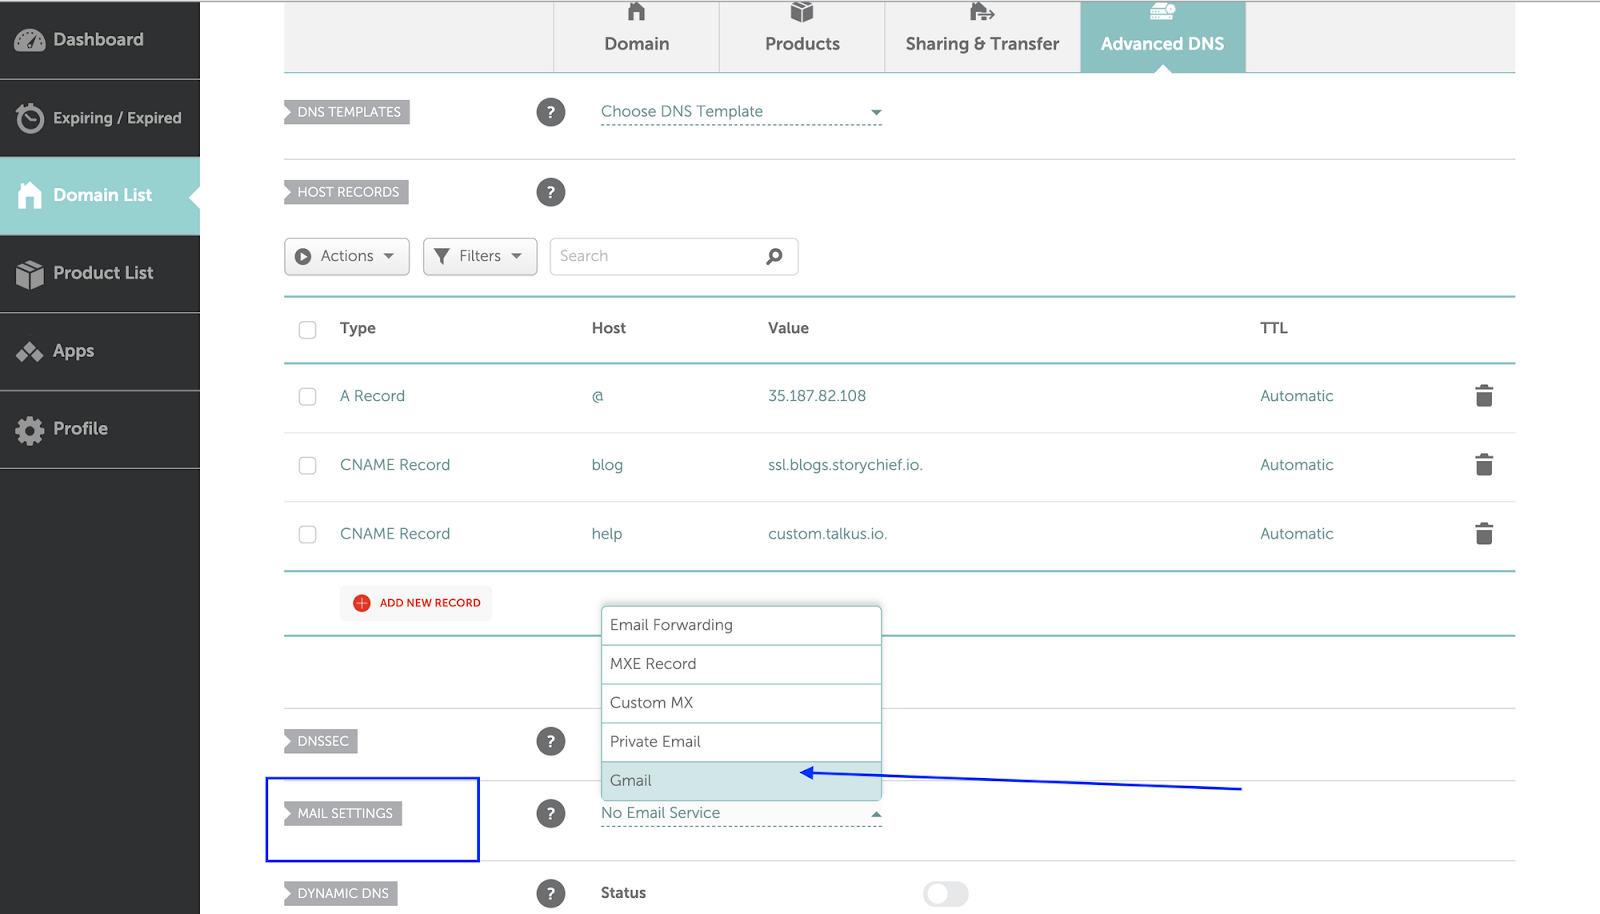
Now we come to MX record. In most cases you'd need to delete and create MX record manually, but if you use Namecheap, you can do it with just a few clicks:
- Go to Advanced DNS settings
- Scroll to Mail Settings
- Choose "Gmail"
- Save it!
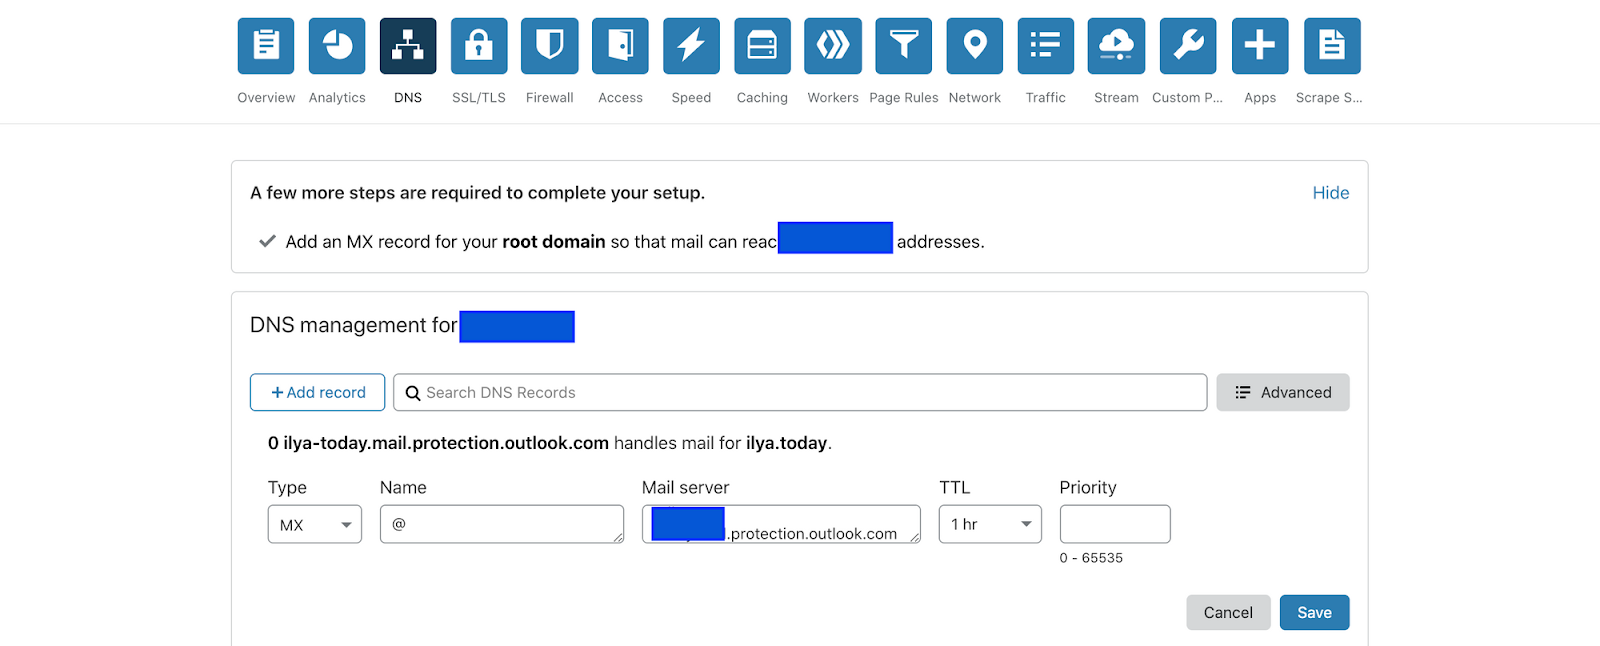
How to create a MX records for Google and Cloudflare
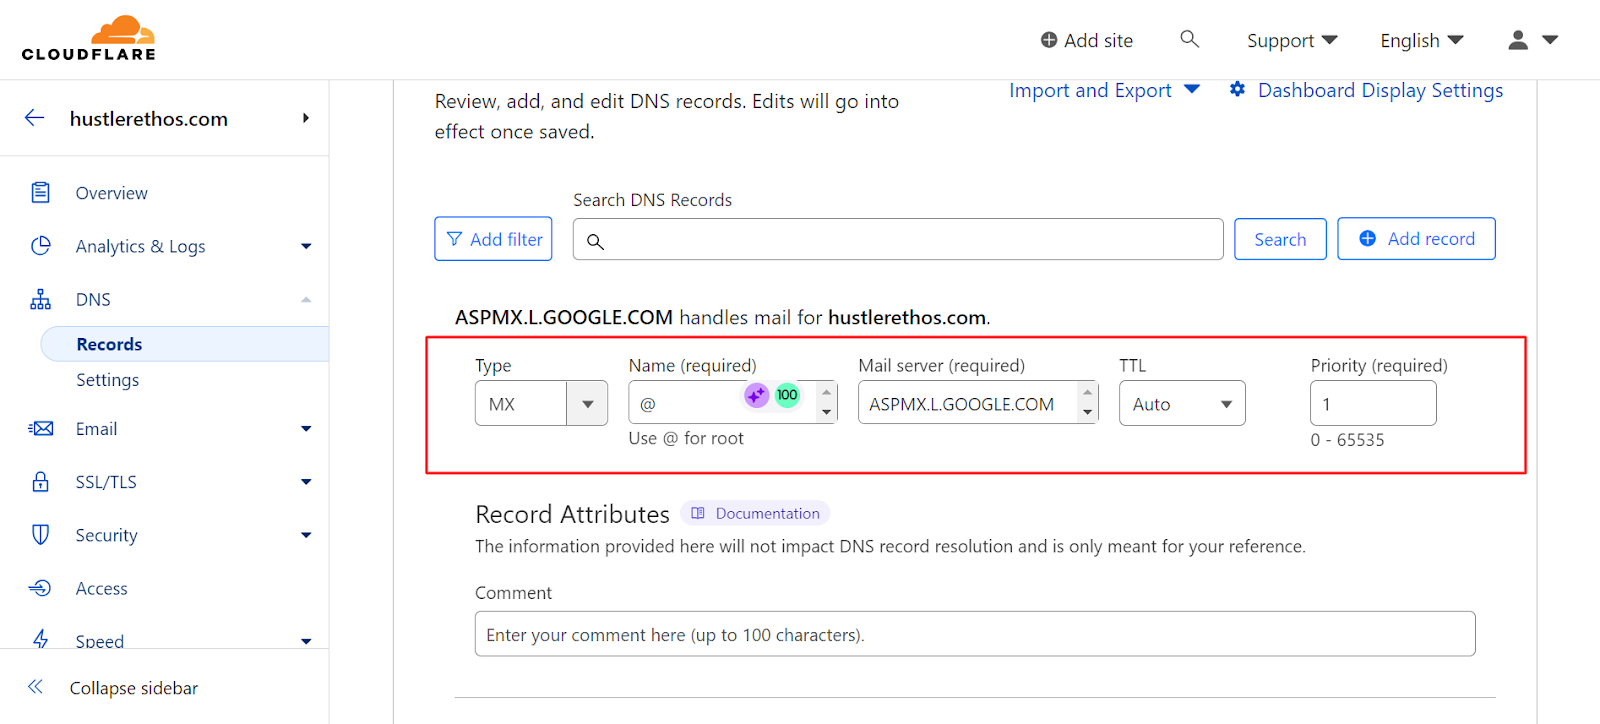
We'll need to create MX records manually:
- Log in to Cloudflare
- Go to Domain list and choose your domain
- Go to DNS
- Click on "Add new record"
- Choose MX record
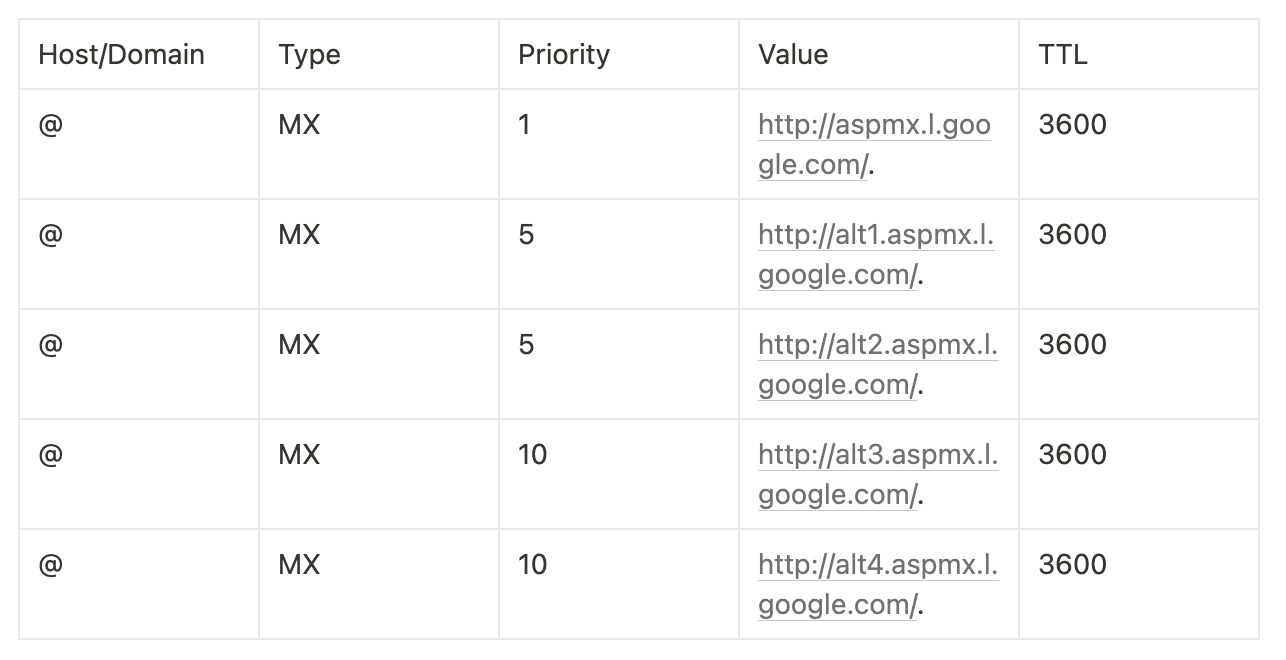
- Put @ in "Name"
- Put ASPMX.L.GOOGLE.COM in Mail Server
- Choose priority = 1
You should also create 4 more MX records with "@" in Name but different Mail Servers and Priorities:
ALT1.ASPMX.L.GOOGLE.COM priority = 5
ALT2.ASPMX.L.GOOGLE.COM priority = 5
ALT3.ASPMX.L.GOOGLE.COM priority = 10
ALT4.ASPMX.L.GOOGLE.COM priority = 10
Save it!
Google Workspace domain verification for Bluehost
We'll need to create MX records manually:
- Log in to Bluehost
- Go to Domain list and choose your domain
- Go to DNS
- Click on "Add new record"
- Choose MX record
- Put @ in "Name"
- Put ASPMX.L.GOOGLE.COM in Mail Server
- Choose priority = 1
You should also create 4 more MX records with "@" in Name but different Mail Servers and Priorities:
ALT1.ASPMX.L.GOOGLE.COM priority = 5
ALT2.ASPMX.L.GOOGLE.COM priority = 5
ALT3.ASPMX.L.GOOGLE.COM priority = 10
ALT4.ASPMX.L.GOOGLE.COM priority = 10
Save it!
Microsoft Office MX records setup example
If Microsoft Office 365 is your email provider choice, we got your back.
How to set up MX records - for all domain providers
During the initial set up, you'll be able to add DNS records. Just create the records that Microsoft suggested.

Don't do that if:
- You need custom DNS routing for your email, for example, to route traffic through an external spam filtering service
- You're already using Exchange on-premises as well as Exchange Online (also called a hybrid deployment)
How to set up MX records on Microsoft Office 365 for Namecheap
Now we come to the MX record. In most cases you'd need to delete and create an MX record manually, but if you use Namecheap, you can do it with just a few clicks:
- Go to Advanced DNS settings
- Scroll to Mail Settings
- Create MX record
- Save it!
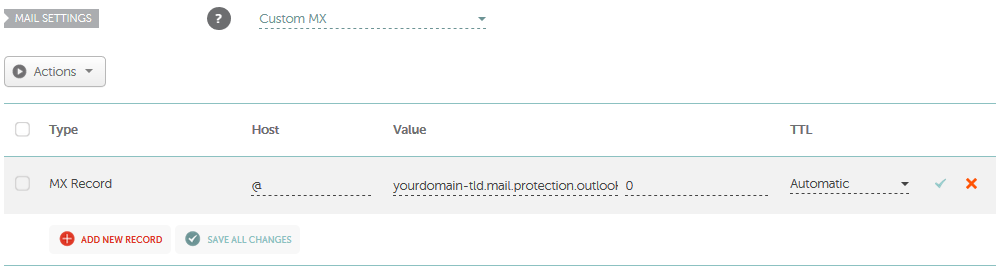
You can take this MX record from Microsoft during your initial set up:
How to configure MX records for Microsoft Office 365 and Cloudflare
Now we come to the MX record. In most cases you'd need to delete and create an MX record manually, but if you use Namecheap, you can do it with just a few clicks:
- Go to Advanced DNS settings
- Scroll to Mail Settings
- Create MX record
- Save it!
You can take this MX record from Microsoft during your initial set-up:
How to add MX records for for Microsoft Office 365 and Bluehost
Now we come to the MX record. In most cases you'd need to delete and create an MX record manually, but if you use Namecheap, you can do it with just a few clicks:
- Go to Advanced DNS settings
- Scroll to Mail Settings
- Create MX record
- Save it!
You can take this MX record from Microsoft during your initial set-up:
Email Communication explained
DNS MX records play a huge role in overall email communication. In order to understand its importance, you must understand how email communication works.
What is email communication?
Email communication is a communication method that uses electronic devices to deliver messages across computer networks. In simple language, we call it “email,” which is short for electronic mail.
"Email" refers to both the delivery system and individual messages that are sent and received.
Here’s a step-by-step breakdown of what happens when you send an email:
1. Email Creation: You write and send an email using an email client like Gmail.
2. Initial Sending: The email client connects to your SMTP (Simple Mail Transfer Protocol) server to send the email.
3. DNS Lookup: The sending SMTP server performs a DNS lookup for the recipient’s domain to find the MX (Mail Exchange) records.
4. MX Records Retrieval: The DNS system returns the MX records, which list the mail servers responsible for accepting email for the recipient’s domain. Each MX record has a priority.
Example:
5. Email Routing: The sending SMTP server tries to connect to the highest-priority mail server first (mail1.example.com). If unavailable, it attempts the next priority (mail2.example.com).
6. Mail Server Acceptance: The recipient’s mail server receives the email and stores it.
7. Email Delivery: The recipient’s email client retrieves the email from their mail server using IMAP (Internet Message Access Protocol) or POP3 (Post Office Protocol).
Frequently Asked Questions
Which MX records do you need for lemlist?
You need to set your SPF, DMARC, and DKIM.
Setting them up will ensure a good foundation for email deliverability.
That is why this is a must before running your first campaign or even sending any email.
Can I have multiple MX records for my domain?
Of course. That’s what the priority setting is for.
Setting up multiple MX records allows you to have backup servers if any server experiences issues.
How to check your current MX records?
One of the easiest ways to check the MX records of any domain is to use the command prompt on your computer.
- Open the command prompt or terminal
- Type or paste the following command and hit enter: “nslookup -type=MX yourdomain.com” Make sure to change the domain name to your domain.
- If you already have your MX records set up, you should now see them on your screen.
Alternatively, for a simple check, use our technical setup checker tool below:
Key takeaways
- Setting up your MX record means allowing for emails to come to your inbox in the first place
- The setup of MX records isn't difficult as long as you have a tutorial to follow - anybody can do it
- Need a tutorial for a different domain provider? Go here
- Can't figure out what your domain host is? Click here
☝️ Once you configure your MX records, the job is not done. You have to set up DKIM next, then audit your email sender reputation.